Mission 1
1. Click Aunt Arctic, and she tells you about her missing green and purple puffles.
2. Use your spy phone, or the map in the top-left corner, to go to the ice rink.
3. At the ice rink, move to the right, pick up the photos on the ice, and put them in your inventory.

4. Go back to Aunt Arctic’s igloo, and give her the photos of the puffles.
5. Go to the pet shop.
6. In the pet shop, move to the left and click the note pinned to the roof of the puffle house.

The note is in secret-agent code.
7. Click Code in the bottom-right corner to see the code translator.

We translate most of the note, but one part of the note is different each time you go on the mission. You have to decode that part.Here is what the note says:
G HAS [you decode this part] PAIRS OF SOCKS
So you just have to decode how many pairs socks G has using the code translator.
8. Go back to the sport shop and talk with G.
9. When he asks you if he can get you something, click “Yes, please!”
10. Then click “Do you have any SPECIAL items?”
11. Type your answer for how many pairs of socks he owns, from the secret message you decoded in the pet shop.

Remember, you may have to decode how many pairs of socks G owns each time you go on the mission.
12. After you enter the right number, ask, “May I see some spy gadgets?”
G shows you some spy equipment.

13. Put the life preserver shooter in your inventory.
Don’t take the grappling hook yet.
14. Go to the iceberg.
15. Use the the life preserver shooter to launch life preservers out to the stranded penguins.
Pay attention to the wind direction, and aim carefully.
16. After you save them, click the penguins, especially the green one on the left, if you want to talk with them.

17. Go to the sport shop.
18. From the spy-equipment cabinet, put the grappling hook in your inventory.

19. Go to ski mountain.
20. From your inventory, click your spy phone.

21. Click the red-blinking light at the top of your spy phone.

22. From the tools that fold out, click the wrench.

23. Put the wrench on the telescope to repair it.
24. Now look through the telescope and move to the left to see the green puffle flying around the tallest mountain.
25. Go to the tallest mountain.

26. Take the grappling hook from your inventory and toss it up to the highest part of the tallest mountain.

27. Up on top, you find the missing puffles.
28. After you return her puffles to Aunt Arctic, be sure to get your medal of excellence.

Mission 2
1. Talk with Gary the Gadget Guy.

He asks you to solve a riddle.
2. Use your spy phone, or the map in the top-left corner, to go to the ski mountain.
3. Click the sign post on the mountain.
The signs all have secret-agent code on them.
4. Decode the sign on the right, for the Bunny Hill.

It says: mogul
(The other signs say slide, tube, and hill, but you don’t need to use those. If you want to decode them, use the code translator in the bottom-right corner.)
5. Go back to the sports shop and see G.
6. Type mogul, and click “This is the word!”

G now tells you your mission is to test-drive his new prototype sled.
7. Put the sled in your inventory.
8. Go to ski mountain.
9. Take the sled out of your inventory and click the sign “TEST Run.”

10. Click “Yes” if you would like to test G’s sled.
11. Steer the sled with your mouse.
Don’t worry if you hit things and can’t steer very well. You are supposed to crash!

You wake up in the wilderness behind the mountain.
12. Put the rope in your inventory.

13. Move to the right and put the Survival Guide in your inventory.

You can read the Survival Guide if you want to see how to complete the mission. Click the Survival Guide in the top-left corner to read it.

14. Move forward to the O berry bush.

15. Put three O berries in your inventory.
You can put all three O berries in the same inventory slot.

16. Move a bit to the right of the O berry bush, to the tree with a pot in its branches.

17. Shake the tree trunk three times.

The pot falls out.
18. Put the pot in your inventory.
19. Move back to the left a bit till you see the stump.

20. Move forward to the stump.
You see five puffles.
21. Click one of the puffles.
The green, purple, pink, and blue puffles run away.

22. From your inventory, give an O berry to the black puffle.
He is now your friend.
23. Move to the left till you see the log.

24. Move to the log.
25. Put the ski in the bush on the left in your inventory.

26. Now get back to the O berry bush.
27. When you are by the O berry bush, go left till you see the stream.

28. Move to the stream.
29. At the stream, go left.
30. In your inventory, put the rope on the ski.

31. Now put take an O berry from your inventory and put it on your new fishing pole.

32. Take the pole out of your inventory and click the stream.

You caught a fish!
33. Put the fishing pole back in your inventory.
34. Put the fish in your inventory.
35. Take the pot out of your inventory.
36. Click the pot on the stream.
The pot scoops up some water.

37. Put the pot full of water back in your inventory.
38. Go to the right till you see the cave.
To the right is a log.

39. Put the log in your inventory.

40. Move to the cave.
41. Click the bushes and then walk into the cave.

42. In the cave, move to the right.
43. Click a stone to make a fire ring.

44. Take the log from your inventory and put it in the fire ring.

45. Take the Survival Guide from your inventory and put it on the log.
The guide is torn up and put around the log.

46. Take the last O berry from your inventory and give it to the puffle.
The puffle lights the fire.
47. Take the fish from your inventory and put it on the fire.

48. Click the fish to eat it.
49. Take the pot of water from your inventory and put it on the fire.

50. Click the pot of water to drink it.
You fall asleep and then wake up.
51. Move to the left to leave the cave.
Outside, an agent flies in with a jet pack and talks to you.
52. Tell him what happened.

He takes you back to G.
53. Back in G’s office, tell G what happened.

54. Be sure to collect your medal and letter.
Mission 3
1. Talk to the new secret agent.

The agent will tell you what happened. He will close the vault door.
2. Go in the door to the gift shop manager’s office.

3. Look around the room till you see the couch.
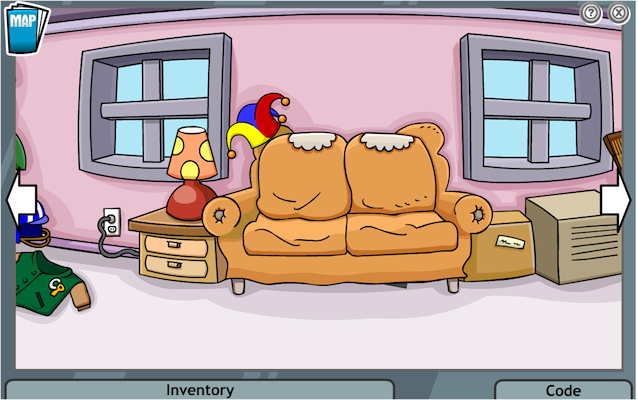
4. Click under the couch.

5. Put the paper clip and BOOT computer disk in your inventory.
6. Look around for the computer.

7. Click the computer.
8. Turn the computer on.
9. Take the computer disk from your inventory and put it in the computer.

10. On the screen, click My Files.
11. Click Combination_Number.

12. Write down the letters and the numbers next to the letters.
The numbers change each time you do the mission, so you need to write them down.(If you want, you can also play the Ice_Bricks game on the computer!)
13. Go back downstairs.

14. Click the vault door.
15. Click the vault handle to enter the combination numbers you wrote down.

The number next to N goes on top, the number next to E goes on the right, the number next to S goes on the bottom, and the number next to W goes on the left.
16. Click the red CONFIRM button.
The vault door opens.
17. Go in the vault.
18. Talk to the new secret agent again.
Your cell phone rings.
19. Click your cell phone in your inventory.

G tells you to meet him in HQ.
20. Click the Visit HQ button on your cell phone to go to see G.
21. Talk to G, who will tell you about what he’s found.
22. Click the screen G is pointing at to see the video.

23. After you watch the video, talk to G again.
24. Say “OK. Do you have any suggestions?”
G will tell you to look on the roof.
25. Click “Ok thanks G. Is there anything else I need to know?”
26. He will tell you to take the key marked rooftop from a drawer.
28. Click the drawer.
29. Put the key in the top-left corner in your inventory.

The key says “Roof Top” in secret agent code. (The other keys say “Lounge,” “Ski Shop,” “Office,” “Boiler Room,” and “Coffee,” but you don’t need to use any of them in the mission.)
29. Go back to the gift shop, and go up to the manager’s office again.
30. Take the key from your inventory and open the door to the roof.

31. Put the key back in your inventory and go out to the roof.
A giant magnet!

32. Take you spy phone from your inventory, and click the flashing red button.
33. Click the wrench that comes out.
34. Click the wrench on the front of the Powa Box.

It unbolts the front of the Powa Box.
35. Put the wrench back in cell phone.
36. Take the paper clip from your inventory and put it in the Powa Box.
It shuts down the Powa Box.
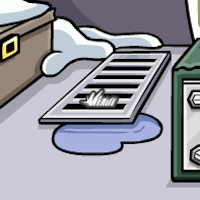
37. Put the white fur that is stuck in the vent on the left in your inventory.
38. Go downstairs to the vault.
The money is on the ground.
39. Go back to HQ and talk with G.
40. When G asks if you found anything else, tell him you found the white fibers.
41. From your inventory, give G the white fur.
G will ask you if you are interested in another small mission.
42. Say “Sure, what is it you need me to do?”
He will tell you to go to the boiler room and reset the fuses to turn back on the power.
43. Don’t leave HQ yet!
44. Move to the right till you see the map of Club Penguin.

45 Put the flashlight on the table in your inventory.
46. Use your cell phone to teleport to Town.
47. Talk to the penguin.

48. Go in the Night Club.
It is dark.

49. Click the flashlight in your inventory to turn it on.

If you are a member, you can click your night-vision goggles in your inventory instead.

50. Go to the right till you see the speaker with the secret entrance to the boiler room.

51. Click the speaker to go to the boiler room.
52. Look around till you see the Fuse Box.

53. Click the fuse box.
54. If you are using your goggles, turn them off.
The flashlight turns off automatically.

55. Click the fuses till they all turn green.
This can take a while. Be patient and keep clicking. I’ve sometimes got it in 5 tries, and sometimes it seems like it took 5 minutes. Don’t give up!(If you absolutely can’t turn all the fuses green, you can go back to HQ and ask G to do it for you. But you won’t get the thank-you card at the end.)
56. After you turn on the lights, go back up to the dance club and talk with the brown penguin again.
57. Now go back to HQ and talk to G.
58. Be sure to get your medal of excellence and thank-you card.

Mission 4

- Talk to G and ask him to let you into the Gadget Room.
- Go into the Gadget Room and head to the left.
- Pick up the Life Preserver Shooter from the bookshelf.
- Go to the Ski Village.
- Pick up the white fur and the very bottom of the lift.
- Go into the Ski Lodge.
- Go to the right.
- Pick up the fishing rod that is beside the door with the Gone Fishing sign.
- In your inventory, combine the fishing rod with the life preserver shooter.
- Go to the Sport Shop and move to the right.
- Click the belt on the green winking penguin mannequin and put it in your inventory.
- Go to the Lighthouse and go to the right.
- Pick up the piece of rope that’s on the red boat.
- Combine the rope with the life preserver shooter in your inventory.
- You now have a complete Penguin Rescue device!
- Go upstairs to the beacon at the top of the lighthouse.
- Open your spy phone and then click on tools and then your spanner.
- Click on the telescope to unscrew it and then put it in your inventory.
- Go back to the Sport Shop
- Go into Gary’s Room and then go to the right.
- Put the telescope on the tripod near a window in Gary’s Room.
- Click the telescope.
- Use the arrows to see the paths that lead to the stranded penguins and memorize the right way to go.
- Go to the Ski Mountain.
- Go down Ridge Run.
- Go down the paths that you saw in the telescope. Go down the right paths until you get to a broken fence.
- Hint: MIDDLE-RIGHT-LEFT-RIGHT-MIDDLE
- Click the Penguin Rescuer on the hole in the fence.
- Break the branch over the right with the Tube.
- Pick up the Penguin on the tree first.
- Now pick up the penguin on the right.
- Now put a penguin back on the tree.
- The tree is bent so now you can get to the penguin under the tree.
- Pick up the penguin you left on the tree.
- Put all three penguins on the edge with the rock on it.
- The rock will fall on the sled that the last penguin is stuck in.
- Pick up the three penguins on the edge.
- Pick up the last penguin that bounced off the sled.
- After you rescue all four penguins go to the Ski Village.
- Talk to the crying brown penguin.
- Get the belt you took out of your inventory & click the ski lift.
- The belt fixes the ski lift!
- The brown penguin is really happy!
- Go to the Ski Hill.
- Talk to G.
- Give him the white fur.
- Get the medal & the Handy Penguin Award. Read the letter. You are finished!
Mission 5
1. Talk to Gadget.

He tells you to take a look at the Furensic Analyzer 3000. You find a bit of puffle fur stuck in the analyzer.
2. From your spy phone, take the comb and use it to straighten the puffle fur so it goes in.

The analyzer matches the fur to a pink puffle.
3. Now, G asks you to scan the fur that you found in mission 3.
4. Take the fur from G’s hand, and put it in the analyzer.
The analyzer reports it is an unknown specimen but is able to identify substances on the fur.
The analyzer finds hot chocolate, hot sauce, and jet-pack fuel on the unknown fur sample.
5. G tells you to find larger samples of the elements found on the fur so he can use them to calibrate his special goggles.
6. First, go to the coffee shop for the hot chocolate.
You find a mess in the shop.

7. Ask the barista behind the counter what happened.
He tells you about a “big, strange angry thing” he saw. He drew a picture of it and shows it to you.

8. Click the drawing he puts on the counter to see the monster.
9. Talk to the barista again, and ask him for some hot chocolate.
10. He tells you he can’t make you a cup: The shop’s hot-chocolate machine is broken.
11. Click the hot chocolate machine behind the barista.
12. In your inventory, click your spy phone and grab your wrench.
13. Use the wrench on the milk hose over on the left to reattach it to the machine.

14. Put your wrench away, and click the Cold/Hot dial on the right side of the machine to move the dial from Cold to Hot.

15. Take the mug from the top of of the machine, and put it under the hot-chocolate spout.
16. Press the Hot Chocolate button, and you discover you need chocolate sauce.
17. Head over to the pizza shop.
It’s a mess too!
18. Ask the pizza chef what happened.
He tells you he also saw a “really hairy, mutant crab!”
19. Ask him if you could take a sample of of the hot sauce and the chocolate sauce.

20. Put the two sauces in your inventory.
21. While you are in the pizza shop, ask the chef if you can do anything for him.
He asks you to deliver a pizza to a penguin fishing behind the ski lodge.
22. Take the pizza box from the counter, and put it in your inventory.

23. Go to the ski lodge, head out the back door, and deliver the pizza to the penguin fishing behind the lodge.
24. Return to the coffee shop.
25. Click the hot-chocolate machine. Take the chocolate sauce in your inventory and pour it in the Insert Chocolate funnel on top of the machine.
26. Press the red button for hot chocolate, and—tah dah!—hot chocolate fills the mug!
27. Put the mug of hot chocolate in your inventory.
28. Return to HQ, and enter the gadget room.
29. Grab the AC 1000 from the Prototypes shelf, and put it in your inventory. You need it in a bit.

30. Go to the lighthouse.
31. While you are in the lighthouse, take the rope on the boat …

… and the fishing net beside the wooden steering wheel …

… and put them in your inventory. You need them later.
32. At the foot of the stairs, you find two startled penguins. Talk to them.
33. Head up the stairs to the top of the lighthouse.
34. Take the AC 1000 from your inventory, and click it on the floating jet-fuel can to blow the can to you.

35. Take the scissors from your spy phone, and snip the string on the jet-fuel can.
36. Return the scissors to your spy phone, and put the jet-fuel can in your inventory.
37. Return to HQ, and talk with G.
38. Tell him you have found all the elements.
39. From your inventory, pour the hot chocolate, the hot sauce, and the jet-pack fuel in the funnel on the left side of the calibration machine.

40. Now, take the goggles from the calibration machine and put them in your inventory.
Click the goggles in your inventory to wear them and to turn them on and off.
41. With the goggles turned on, track the paw prints from the pizza shop, to the coffee shop, to the lighthouse, and finally to the ski lodge.

42. Enter the ski lodge.
There, the penguin you delivered the pizza to is hiding under the couch cushions.
43. Talk to him.
He tells you he almost caught a giant fish while fishing, but he saw a giant shadow behind him and decided to hide inside the lodge.
44. While you are in the ski lodge, take the candle from the candleholder next to the sofa and put it in your inventory. You need it in a bit.

45. Go out the back door.
You see the shadow of the monster and hear him say that he is cold and needs a candle.
46. In your inventory, put the rope on the fishing net to create a trap.
47. Put the trap on the tree.
48. From your inventory, put the candle in the trap.
The crab scuttles over and get caught in the trap. The monster, however, runs away.
49. Put the tuft of fur the monster left behind in your inventory.

50. Put the captured crab in your inventory.
51. Return to HQ, and talk with G.
52. Tell him about what you caught, and hand him the crab.
53. Put the tuft of fur you found in the Furensic Analyzer 3000.
You find out that the tuft of fur came from a ….polar bear!
54. Now talk to G again.
Mission 6
1. Talk with Gary the Gadget Guy, and he tells you he is about to use the Crab Translator 3000.

After Gary starts it up, the Crab Translator 3000 explodes and the crab escapes.
2. Follow the crab out of the room and to the ski village.
In the ski village, you can talk with the two penguins. They tell a bunch of jokes.

3. Jump on the chairlift and head up to top of the mountain.
On the top of the mountain, the crab jumps off.

4. Follow the crab, and jump off the back of the mountain.
You land in the same deserted area you were in in Mission 2: G’s Secret Mission.
5. Follow the crab.
He leads you to a cave with a door. You won’t be able to open the door right now.

6. Search through the woods till you find a sack of O berries strung up in a tree.

You may see a black puffle as you look for the berries. Remember where you see the puffle, if you do find it.
7. Click the red light at the top of your spy phone, and use the scissors to cut down the sack of berries.

8. Put the sack of berries in your inventory.
9. Now, search through the woods till you find the black puffle.

10. Give the puffle an O berry from the sack of berries in your inventory.
The puffle follows you around now, just like it did in mission 2.
11. Search through the woods till you find the cave the crab went in.
12. Take an O berry from the sack in your inventory and put it on the smaller door the crab used to get in.
The puffle follows the O berry and runs through the door and then lets you in.
13. Go into the cave.
When you are inside the cave, a cage falls and traps you.
14. Talk with the polar bear.

He tells you who he is, how he met the crab, and what his plan is. This is pretty long and very funny.
After the polar bear and crab leave, the black puffle comes out from behind a rock. It helps you get out.
15. Go to the left till you see the Cage Lift.
16. Put an O berry on the handle on the right of the Cage Life to make the puffle jump on it and turn on the water.

17. Now put an O berry on the left side of the drain to make the puffle jump on it and make the water pour the other way.

18. Finally, put an O berry on the tray to the right of the waterwheel to make the puffle jump on it and make the water flow to the waterwheel.

The cage lifts.
19. Go to the right and put the Electro Magnet 3000 plan that is on the cave wall in your inventory.

20. Put the bottle of hot sauce on the table in your inventory.
21. In your inventory, put the bottle of hot sauce on top of the sack of O berries to make a flaming O berry.
22. Go right again and stop.

Put the rope and anchor in your inventory.
23. Keep going right till you get to the door.
24. Open the door.
When you open the door, a snow slide covers the opening.
25. Put the flaming O berry on the snow covering in the door.
The black puffle goes nuts and burns through the snow slide. Follow the puffle out the door.

26. Search through the woods till you find a cliff.

27. In your inventory, put the rope on top of the anchor to make a grappling hook.

28. Click the cliff with the grappling hook.

You are back on top of the mountain.
29. Ride the chairlift down to the ski village.
30. Go into the ski lodge.
31. Go out the back door.

The polar bear is behind the ski lodge, working on his mechanical woodchopper.
32. Go back through the ski lodge and into the ski village.
33. Go to the dock and continue walking till you get to the pizza parlor.

34. Go in the pizza parlor, and speak with the pizza maker.
35. When the pizza maker asks want you want, order the Seaweed pizza.

The pizza maker gives you a pizza.
36. Put the pizza in your inventory.
37. Walk back to the ski lodge, go inside, and go out the back door again.
The polar bear is still working on his woodchopper.
38. Take the pizza out of your inventory and put it on the polar bear.

39. While the polar bear eats the pizza, move the handle on the bottom of the woodchopper from the green arrow on the left to the red arrow on the right.
Move the handle from here:

To here:

When the polar bear and crab start up the woodchopper, it shoots backward and falls into the frozen pond.

Gary comes to investigate the commotion.
40. When Gary asks if you found anything interesting, you can click the three answers.
41. From your inventory, give Gary back his Electro Magnet 3000 plan.
(I like the black puffle shooting across the sky!)

42. Be sure to get your medal of excellence and gift.
Mission 7
1. Talk with G.
He tells you about the broken Clock Tower and the other broken clocks.

2. Click the monitor G is pointing to.

You see the polar bear and crab you met in earlier missions removing parts of the clock tower.
3. Talk to G again.
He asks you to help fix the clock.
(If you want to find out more about the clock, go to the snow forts and talk to the penguin standing in front of the clock tower.)
4. Use the map to go to the iceberg.
You see a spring frozen in a large ice cube floating in the water. You can’t get it, however.

5. Use your spy phone to go to back to HQ, and open up the Invention Cabinet.
You see a combination lock using secret-agent code.
6. Close the cabinet, and talk to G.
7. Tell him you need the Electromagnet 2000.

He tells you the password is “key.”
8. Use secret-agent code, and use the arrows to set the lock combination to the lettersk e y.

The combination lock opens.
9. Put the Electromagnet 2000 in your inventory.

10. Go back to the iceberg.
11. From your inventory, take the Electromagnet 2000, and use it to pull in the ice cube out of the water.

12. Put the ice cube and the Electromagnet 2000 in your inventory.
13. Go back to HQ, and go in the gadget room.
14. Take the ice cube with the spring from your inventory and put it on the conveyor belt of the Test Chamber.

15. Click the red handle to move the ice cube into the chamber.

16. Now, press the fire button on the right.
17. Next, press the water button in the middle.
18. Finally, press the snowflake button on the left.
19. Click the red handle again to move the spring out of the chamber.

20. Put the spring in your inventory.

21. Now go to the shelves and take the life-preserver ring off the top shelf and put it in your inventory.

22. Go to the dock, and talk with the two penguins in blue uniforms.
They tell you how they got the clock tower target.

23. You ask them if you can have the target.
They tell you they will give you the clock-tower target if you can hit it with a snowball three times.
24. To hit the target, click and hold your mouse button to build up the power to throw a snowball.

25. Aim a little ahead of the target, and release your mouse button when you are ready to fire.
If you don’t hit it three times, you can keep trying.
When you hit it three times, they give you the target.
26. Put the target in your inventory.

27. From your inventory, take out the life-preserver ring and give it to the penguins so they can keep practicing.

28. Go to the beach.
29. Talk to the yellow penguin sitting in the snow chair.

He tells you his specially made chair was made by a yellow puffle.
30. Take the green bucket by the yellow penguin and put it in your inventory.

31. Go to the town.
32. Talk to the agent, Rookie.
He tells you he is handing out posters for the missing gear.

33. Tell him you’ve been looking for a picture of the gear and ask if you can have one.
He gives you a poster.
34. Put the poster in your inventory.

35. Now go to the plaza, and go in the pizza parlor.
36. Put the sheet of music by the piano in your inventory.

(If you want, go to the ski village and talk with the two penguins about snow quality. You can also use the green bucket to scoop up some snow in the ski village or from other locations around Club Penguin, but it will not be the right kind of snow unless you use snow from the snow forts, as you are about to find out.)

37. Go to the snow forts.
38. Take the green bucket from your inventory and scoop up some snow.

39. Put the bucket of snow in your inventory.
40. Go to the stage.
41. Take the sheet of music from your inventory and put in on the piano.
You see a yellow puffle peek out from behind a curtain.

42. Play the song on the sheet music, using the colored notes and piano keys as your guide.
The yellow puffle comes out.
43. From your inventory, take the poster and give it to the yellow puffle.
44. Now from your inventory, take the bucket of snow and give it to the puffle.
The puffle makes a gear out of snow!

(If you give the puffle snow from anywhere but the snow forts, the gear will fall apart after the puffle builds it.)
45. Put the bucket back in your inventory.
46. Put the gear in your inventory.
47. Head back to HQ, and go in the gadget room again.
48. From your inventory, take the snow gear out and put it on the conveyor belt.

49. Turn the red handle to put the gear in the chamber.
50. Press the red snowflake button on the left.
You superchill the gear.
51. Click the red handle to move the gear out of the chamber.
52. Put the gear back in your inventory.
53. Go to the snow forts.
54. Click near the bottom of the watch-tower clock.

55. Take the spring from your inventory and put it in the back of the clock.

56. Now from your inventory, take out the gear and put it in the back of the clock.

57. Finally, from your inventory, take out the red target and put it on its arm on the left of the tower.

The clock is working now, and the worker is happy.
Your spy phone rings.
58. Answer your spy phone.
It’s the polar bear!

Now G walks out and tells you you did an excellent job.
59. Talk to G.
He tells you what will happen next.
60. Be sure to get your medal and gift.

Mission 8
1. Talk to G at the beginning
2. Go to the dock.
3. When you get there your going to talk to herbert
4. He shows a map,But it gets cut.
5. After Herbert Leaves, follow the map.
6. One piece of the map is towards the Night Club. Don’t worry about that just yet..
7. Follow the other piece going away.
8. It flys into a persons newspaper. Now you should talk with them.
9. They will want a pizza, so go to the Pizza Parlor and buy them a quick pizza.
10. Give the pizza to the map, but itll get cut, and they will give you their newspaper.
11. Take the piece of the map out of the newspaper and put it into a blank slot.
12. Now go to the Coffee Shop. Help with cleaning up the cookies. Then you get offered some cookies.
13. Take one of the cookies, and give it to the puffle in the town. He will try get it.
14. He wont make it and he comes down and says he could fly if he had a bigger hat.
15.Go back to the HQ and you will see a propeller cap around G.Pick it up and that is a good size hat for the puffle so you will bring it back over to the puffle.
16. The puffle you give the hat to will get the map piece down for you
17. Now you will have to go back to the dock and go into the cave you will see.
18. Now follow the directions in the messege we found and click the holes in the directions of the messege. (Once you enter first hole use night vision goggles)
19.Now you use the spy phone wrench to unscrew the pipe on the gift shp door.
20.Now go to the lighthouse and get the net outside and the balloons inside.Also get the tent nails in the sports shop. Also go to G and ask for his super helium and some cream soda.(Helium found near test chamber)
21.Now blow up the balloon with the helium and shake up the soda and get it under the gift ship for a lift.
22.Fill the balloon and put it on the right side of the gift shop above ground.
23.Put net,hammer,nails all on it now.
24.Go through the opening youll see under the cave.
25.Talk to herbert in the boiler room.
26.Now you will have to fix the pipes in the boiler room.Connect them from the top left to the bottom right.
27.Now you talk to G at the HQ and you completed mission 8!
Mission 9
1. Talk to G. Then put 3 tracking devises, the yellow duck, and the blue print into your inventory.
2. Go to the Ski Lodge and click on the two penguins playing Find Four. Find all of the pieces, put them into a pile, and give them to the penguins.
3. Pick up the string by the carpet in the Lodge Attic. Put it into your inventory.
4. Go to the Forrest and pick up the sticks.
5. Put the sticks, the blue print, and the string together in your inventory.
6. Go to the Plaza and talk to the penguins. After the puffle blows a bubble, click the part stuck between the penguins. Take the bubble gum and put it into your inventory.
7. Go to the Mountain and put the kite on a transmitter. Then put it on a poll.
8. Go to the Dock and help the penguin by pulling up the brown start handle. Then borrow the penguins air pump.
9. Put the gum on the yellow duck and then put the air pump on the duck.
10. Go to the Ice Berg, and place the duck onto the water.
11. Go to the Mine Shack and talk to the penguin. Click and drag the wooden boards, making the metal beam drop on the left side. Click twice on the cart surfer cart that is tipped over and weld all the cracks.
12. Place the transmitter into the cart and then click in the mine for the cart to go down.
13. Answer your spy phone and talk to G. Take the Binoculars 3000 from G at the HQ.
14. Go to the Ski Lodge, and click on the “Go Fishing” door. Look through the binoculars.
15. After Herbert leaves, go to his camp and look around.
16. Go to the HQ and talk to G.
17. Go back to Herbert’s camp and place the spy phone on the binoculars.
18. Put the spy phone / binocular combo into the left tree.
19. Go back to the HQ and watch Herbert and Klutzy.
20. Collect your medal and receive your chocolates.
Mission 10
Mission 11
1. Talk to Gary and tell him that you are ready to start the mission.
2. Gary will ask you about the seeds. In the language of science they are called ”Poaceae”. Gary will ask you what is the name of it but not a scientific name. First you should say ”Are those Flower Seeds?” and then answer with “Corn Seeds”.

3. Go to the Town, then to the gift shop. Talk to Rookie and pick up the other yellow corn seeds which are evidence on the floor.

4. Go upstairs and talk with the Jet Pack Guy. Pick up the yellow corn seeds under the desk.

5. Go back to the PSA HEADQUARTERS because Gary will call. Your spy phone will have a bad connection. Either keep clicking or head to the headquarters by going through the Sports Shop.
6. Herbert will take over the screens in Psa Headquarters.
7. Go to the Lighthouse. When you are there, you should see a CD which will be under the piano. Pick it up and use the bottle and rag to the left of it to clean the disk.

8. Click on the bucket and put it in your inventory. For extra credit, go to theBeach and fill the bucket up with water.
9. Go to the back room of the PSA Headquarters and put the filled bucket on the conveyor belt. Then press the switch, then the snow icon, and finally the red switch. A round ice block will come out.

10. Go to the Beacon and give the mechanic the ice block. Take the lens next to the mechanic and give this to the brown penguin at the Ski Lodge.

11. Go to the Ski Village. You are going to find a DVD player behind Herbert’s screen.
12. Click on the DVD Player and put the disk in it. Then Herbert’s music will play.
13. Go back to the DVD player to stop it. Use the wrench to open the electrical box to the right. Guess the correct code for the box. The colors are not the same for everyone.

14. Go to the mine, then the corn room. Follow the steps which the popcorn on the ground leads. When doing this, pick up the four pieces of paper and the wood.
15. To complete the maze, go to the left path near the watering can, then the left near the kernels of corn, then right near the fertilizer, then left near the hot sauce, and then left near the coffee beans.
16. Herbert will be on his computer laughing. Unplug his personal computer so that he will then send you back to the Psa Headquarters.

17. Click on the orange book to the right. Click on the target, then click on the help to fill the puzzle in the right way.
18. After this, there will be a bunch of talking. You will have beaten the mission. Claim your medal and special gift.
19. Now that the mission is done, click on the snow globe gift for helping. In this, there are a special pair of Spy Goggles. Get them by clicking on the red button on the side.